Kubernetes

Introduction
Kubernetes, which was first released on June 7th, 2014, has quickly established itself as the de facto industry standard for orchestrating containers. According to Red Hat's State of Enterprise Open Source 2022 report, 70% of the 1,296 IT leaders polled said their organizations use Kubernetes.
This figure is expected to rise further, as nearly one-third of the polled IT leaders said they planned to significantly increase their use of containers over the next 12 months, and there have been over a million downloads of this particular tool so far.
What is Kubernetes?
Kubernetes is an open source container management system. It was originally developed by Google engineers to help them manage large-scale containerized applications, and it has since become the most popular solution for running containers in production.

Kubernetes is a platform for running containerized applications. It's designed to make it easier to deploy, scale, and manage those applications—which are usually made up of multiple containers that work together to provide features like web serving or data processing.
Kubernetes can be thought of as a distributed system for managing containerized applications at large scale. Kubernetes clusters are made up of one or more master nodes that control worker nodes, which run tasks on behalf of clients through API requests sent over HTTP or gRPC protocols.
How does Kubernetes work?
Kubernetes is used for automating the deployment, scaling, and management of containerized applications. It supports multiple platforms and infrastructure providers.
Kubernetes provides two primary things:
- A way to manage your container clusters.
- A way to get data from one place to another (such as from a database to an application)
Kubernetes also provides a lot of features that make it easier to manage your cluster of containers. It includes a built-in UI interface, allowing you to manage everything from a single location. It also has automatic recovery and self-healing capabilities, so if something goes wrong with one of your nodes (like an outage), Kubernetes will automatically restart it when the issue is resolved.

Not only that, it is also highly configurable. You can use it to deploy any type of application, from web servers to databases. It has support for many different cloud environments, including Google Cloud Platform, Amazon Web Services (AWS), and Microsoft Azure.
What and why containers?
Containers are a way of packaging and running applications in a portable and isolated environment. They allow applications to be run in a consistent and predictable manner, regardless of the underlying infrastructure. This makes it easier to develop, test, and deploy applications, as well as to run multiple applications on the same host without them interfering with each other.
Containers have become popular recently because they provide a number of benefits over traditional deployment methods. For example, they are:
-
Lightweight: A container is a single process that runs on a machine and includes only the libraries, configuration files, and other dependencies it needs to run. This means containers can be started quickly, as there is no need for the initial setup of a virtual machine (VM), which can take time depending on its size.
-
Portable: Containers can be moved from one environment to another with minimal effort because their entire runtime state is included in each container. Containers also provide an additional layer of abstraction between an application's code and the underlying OS kernel, making it easier to move applications between servers while maintaining compatibility with all dependencies installed inside them—you don't have to worry about incompatibilities between your app's software stack and whatever server you choose!
-
Isolated: To keep containers separate from each other on the same host machine, they run in separate namespaces—this means that even if two or more processes share an IP address outside their respective namespaces, they won't necessarily be able to access each other's files or ports! Using this approach reduces port conflicts since network services won't need specific ports opened up on hosts just so the operating system knows where to send data destined for certain applications.
:::info The level of isolation provided by containers can vary depending on the container runtime and the specific configuration of the container. Some container runtimes, such as Docker, provide a high level of isolation by default, while others may provide more limited isolation. However, in general, containers are designed to provide a certain degree of isolation to ensure that they can run independently and reliably. This makes it easier to set up and manage complex infrastructures with many different applications, all running on the same host. You can also run multiple containers on the same hardware with minimal overhead since they're isolated from each other. :::
How do containers compare to virtual machines?
Containers are more lightweight than virtual machines (VMs) in that you don't need to run an entire operating system. Containers are also more portable, as they're typically created from a Dockerfile or other source code and can be moved around easily on your machine.

Containers are more efficient than virtual machines because they allow you to send just the right amount of data over the network. This is especially important for microservices, which need to share resources but often can't because different users have different needs (like different database sizes).
Containers are more scalable than virtual machines because it's easier to increase their size as needed; all one has to do is allocate more resources (RAM) and/or CPU cycles when deploying new containers onto existing hosts with Kubernetes' replication controller feature set built-in for this purpose!
Containers are "kind of" safer than virtual machines because there isn't much that can go wrong with them while they're running. For example, each container instance can start new processes while also handling requests from programs running outside of that container instance using its own IP address. This is very different from how things are handled inside a virtual machine, where processes running on the same host share resources with one another.
With containers, you can achieve true cloud portability
Containers can indeed provide a high degree of portability and allow applications to be easily moved between different environments. This is one of the key benefits of using containers, as it enables organizations to develop and deploy applications consistently and predictably, regardless of the underlying infrastructure.
Containers provide this portability by packaging the application and its dependencies into a self-contained unit that can quickly move and run on any host with the necessary container runtime. This means an application can be developed and tested on one system and then run in production on another without any changes or modifications. Additionally, containers are designed to be portable and run on various infrastructures, from on-premises data centers to public clouds. This allows organizations to choose the best environment for their applications and to move them between different environments if needed quickly.
Rise of containerisation is promoting adoption of Kubernetes
The rise of containers has indeed played a significant role in promoting the adoption of Kubernetes. Kubernetes is a container orchestration platform, which means that it is designed to manage and deploy large numbers of containers across a cluster of machines.
As containers have become more widely used, there has been a growing need for effective ways to manage and deploy them at scale. This has led to the rise of Kubernetes and other container orchestration platforms, which provide the necessary tools and features for managing and deploying large numbers of containers.
Additionally, Kubernetes has been designed to work seamlessly with containers and to provide a consistent and predictable way to run and manage containerized applications. This has made it an attractive choice for organizations using containers and looking for a powerful and flexible platform for managing and deploying their applications.
Kubernetes Architecture
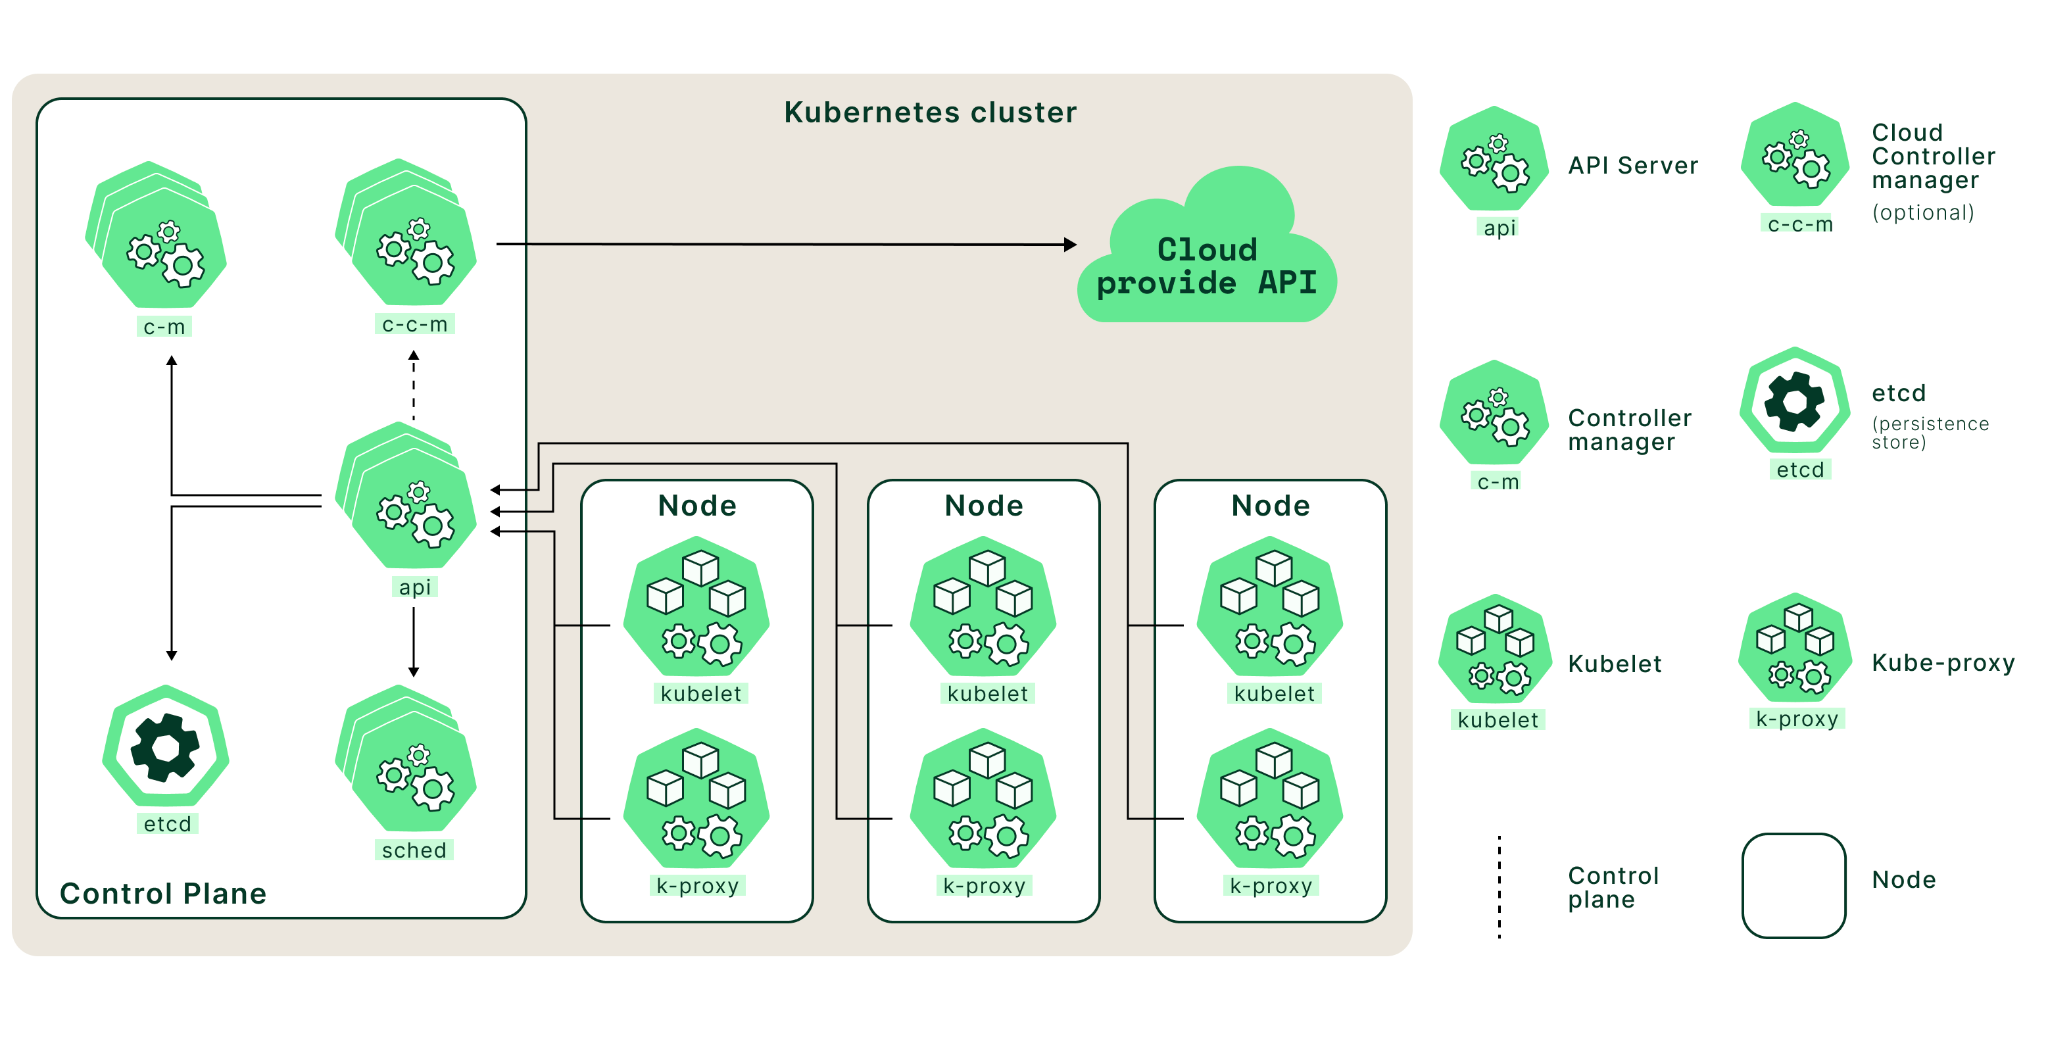
Control Plane Components
The control plane is a set of components that comprise the core of Kubernetes. These components are responsible for scheduling, creating, and managing containers across a cluster of nodes.
kube-apiserver
At its core, the Kubernetes API server acts as an intermediary between user requests and the underlying components of a given cluster. It works by receiving requests from users via an HTTP or HTTPS request, validating those requests using predefined rules, and then forwarding them to other components (such as nodes) to perform an action such as deploying or scaling an application.
The API server also interfaces with other components in the control plane. For example, it can receive requests from the scheduler to create new pods in a cluster or talk to the controller manager to adjust an application’s resource utilization
etcd
etcd is an open-source storage system that stores data as key/value pairs across multiple servers in a cluster. Kubernetes uses etcd as its primary storage mechanism for storing all its cluster state information, such as configurations, endpoint information, service definitions, secrets, etc.
etcd can be set up in a highly distributed manner across multiple nodes so that no single node can become a point of failure. If one node fails or becomes unavailable, other nodes still have access to the same consistent set of data, making it possible to maintain availability and high performance even under extreme load conditions or during unexpected outages.
etcd is an indispensable component of any Kubernetes deployment because it provides reliable storage for vital application data while enabling reliable communication among components within and between clusters.
kube-scheduler
Kubernetes has a built-in cluster scheduler that is responsible for assigning workloads to available nodes in the cluster. The kube-scheduler determines which node should run each application within the cluster. The node selection process includes deciding which nodes have enough resources to meet an application’s requirements and which are most appropriate based on user preferences.
The kube-scheduler uses an algorithm known as bin packing to determine where to place containers in the cluster. This algorithm considers all available resources (CPU, memory, etc.) and maximizes utilization while ensuring that no single node is overloaded.
In addition, the scheduler will consider other factors, such as node labels (for example, if certain nodes need to be used only for specific purposes) or affinity rules (which allow you to specify which nodes a particular container should run on). The scheduler also keeps track of any changes in resource usage over time, so it can scale the pods in or out (if pod scaling is configured using solutions such as Horizontal Pod Autoscaler).
If any changes occur in terms of resource availability or user preferences, the scheduler will react by changing existing workload assignments or creating new assignments as needed.
kube-controller-manager
Kubernetes uses a built-in controller framework that ensures that all the nodes in your cluster are running as expected. It includes several controllers, each of which is responsible for a specific aspect of the cluster’s behavior:
- Node controller: The node controller is responsible for ensuring that all nodes in the cluster are healthy and ready to accept workloads. It monitors the status of nodes on an ongoing basis and takes corrective action if any node fails or becomes unresponsive. For example, it can remove the unresponsive node from the cluster if necessary.
- Replication controller: The replication controller runs continuously in the background to ensure that all pods (containers) are running as expected. It can detect when new pods have been added or removed from the cluster and adjust accordingly by starting or stopping additional pods to maintain desired pod count levels.
- Service account and token controllers: These two controllers work together to manage authentication within a Kubernetes cluster by creating and managing service accounts and tokens for users to securely access resources within their environments.
- Endpoints controller: This controller manages communication among services on different cluster nodes. It creates endpoints on those services to allow other services to communicate with them directly without going through an external load balancer. This helps improve application performance by reducing latency across services in a distributed system like Kubernetes clusters.
The kube-controller-manager also provides other essential functions, such as managing the namespace lifecycle, handling service accounts, and managing configuration changes. Overall, the kube-controller-manager plays a critical role in ensuring the desired state of the Kubernetes cluster.:
Worker node components
A worker node is a physical or virtual machine in Kubernetes responsible for running containerized apps, represented as pods and managed by the control plane. Each worker node has a kubelet that connects with the control plane to retrieve the necessary state for the pods operating on that node and a container runtime responsible for running the containers within the pods.
The worker node also runs additional system components, such as the kube-proxy, which aid in managing networking in the cluster. In a Kubernetes cluster, the worker nodes provide the computing power required to run containerized applications.
kubelet
The kubelet is essential to any Kubernetes worker node, acting as a bridge between the master and worker nodes. It runs on each node in the Kubernetes cluster to manage containers, monitoring their health and ensuring that they have access to enough resources for optimal performance.
The kubelet connects with other cluster components, such as the API server, scheduler, and replication controller, to coordinate tasks. Periodically, the kubelet interacts with the API server to retrieve the desired state of the containers and pods running on its node.
The desired state includes information such as which containers and pods must be running on the node, which images must be deployed, and how they must be configured. After retrieving the intended state, the kubelet compares it to the present state of containers and pods on the node. If the current state does not match the desired state, the kubelet takes action to reconcile the two, such as starting or stopping containers or creating or deleting pods.
Kubelet also monitors container health by checking CPU/memory use and notifying the API server of any anomalies related to a specific container’s performance or health status.
kube-proxy
The worker nodes of Kubernetes are responsible for operating the cluster’s applications. The kube-proxy component is essential to these nodes since it functions as a proxy between cluster services and external clients. It controls which services can access each other and ensures that requests from external clients reach the correct service to manage network traffic.
Kube-proxy offers load-balancing features by dispersing incoming requests over different service endpoints. This ensures that all requests are efficiently handled and prevents any single endpoint from overloading.
Kubernetes kube-proxy also manages networking across pods, ensuring communication among containers within and between pods. This enables containers running in different pods to connect without using public IP addresses or directly exposing themselves to the Internet.
Game-changing Implications of Kubernetes
Kubernetes has several game-changing implications for how applications are developed, deployed, and managed. Some of the critical implications of Kubernetes include the following:
-
Increased agility and speed: Kubernetes provides a powerful and flexible platform for running and managing applications, which allows organizations to deploy and update applications quickly and easily. This can reduce the time and effort required to develop and deploy applications and enable organizations to respond more rapidly to changing business needs.
-
Improved scalability and reliability: Kubernetes includes features such as self-healing and autoscaling, which can help to ensure that applications are always available and running at the required capacity. This can improve the reliability and performance of applications and help organizations handle sudden increases in traffic or workloads.
-
Reduced operational overhead: Kubernetes provides a consistent and centralized way to manage and deploy applications across a cluster of machines. This can simplify the operational complexity of running and managing applications and help organizations reduce the time and effort required to maintain their applications.
-
Greater portability and flexibility: Kubernetes is designed to be portable and run on various infrastructures, from on-premises data centers to public clouds. This can give organizations greater flexibility and choice in where they run their applications and make it easier to move applications between different environments. Overall, Kubernetes has the potential to significantly change the way applications are developed, deployed, and managed and can provide organizations with many benefits in terms of agility, scalability, reliability, and simplicity.
Importance of Kubernetes
The use of Kubernetes and containers is growing in importance for software developers and other IT professionals because to their widespread adoption and the many advantages they offer for creating, deploying, and maintaining applications. Some of the reasons why Kubernetes and containers skills are becoming increasingly important include:
-
Kubernetes help you manage your containerized applications. It helps you run and scale your applications, and it helps you do it at a low cost.
-
It is based on the idea that applications should be constructed as small, individual pieces (containers) rather than large, monolithic programs. In a containerized environment, you don't worry about individual machines; instead, you worry about how to run applications and services across potentially thousands of machines.
-
Kubernetes also offers built-in tools for managing applications and services across potentially thousands of machines. For example: You can create groups of containers (known as "pods") on which an application depends by defining labels in its manifest file; then Kubernetes will ensure they're always running together when needed by putting them into the same pod if possible.
-
Your pods can also be distributed across multiple hosts to provide automatic high availability or load balancing. If one host fails or becomes unavailable for some reason due to hardware problems or network connectivity issues, Kubernetes will automatically move any pods running there over to another machine so they can continue running without interruption.
Kubernetes can help with Orchestration and Deployment
Kubernetes can help with orchestration and deployment in several ways. Some of the key ways in which Kubernetes can assist with these tasks include:
-
Automated deployment and updates: Kubernetes provides a declarative approach to application deployment, which means that users define their applications' desired state, and Kubernetes ensures that the application is running as expected. This can make deploying and updating applications easier, as users don't need to worry about the specific steps required to bring the application up or down.
-
Rolling updates and rollbacks: Kubernetes allows users to perform rolling updates and rollbacks, which means that they can update their applications incrementally and in a controlled manner. This can help reduce the risk of downtime or other issues during deployments and make it easier to recover from problems if they occur.
-
Self-healing and autoscaling: Kubernetes includes features such as self-healing and autoscaling, which can help to ensure that applications are always running and available. If a container or application fails, Kubernetes will automatically replace it, and if the workload increases, Kubernetes will automatically scale the application to meet the demand. This can improve the reliability and performance of applications and can help to reduce the operational overhead of managing them.
-
Scheduling and resource management: Kubernetes provides a robust scheduling and resource management system, allowing users to specify their applications' requirements and constraints and let Kubernetes handle the details of running and managing the applications. This can make it easier to deploy and manage applications at scale and help optimize the use of resources in the cluster.
Overall, Kubernetes is designed to provide many benefits for orchestration and deployment and help organizations develop, deploy, and manage applications more efficiently and reliably.
Useful Kubernetes Commands
This page contains a list of commonly used kubectl commands and flags.
Appending --all-namespaces happens frequently enough that you should be aware of the shorthand for --all-namespaces:
kubectl -A
Kubectl context and configuration
kubectl config view # Show Merged kubeconfig settings.

# use multiple kubeconfig files at the same time and view merged config
KUBECONFIG=~/.kube/config:~/.kube/kubconfig2

kubectl config view

# Show merged kubeconfig settings and raw certificate data and exposed secrets
kubectl config view --raw

# get the password for the e2e user
kubectl config view -o jsonpath='{.users[?(@.name == "e2e")].user.password}'

# get the certificate for the e2e user
kubectl config view --raw -o jsonpath='{.users[?(.name == 'e2e')].user.client-certificate-data}' | base64 -d

kubectl config view -o jsonpath='{.users[].name}'    # display the first user
kubectl config view -o jsonpath='{.users[*].name}'   # get a list of users
kubectl config get-contexts                          # display list of contexts
kubectl config get-contexts -o name                  # get all context names
kubectl config current-context                       # display the current-context
kubectl config use-context my-cluster-name           # set the default context to my-cluster-name

kubectl config set-cluster my-cluster-name           # set a cluster entry in the kubeconfig

# configure the URL to a proxy server to use for requests made by this client in the kubeconfig
kubectl config set-cluster my-cluster-name --proxy-url=my-proxy-url

# add a new user to your kubeconf that supports basic auth
kubectl config set-credentials kubeuser/foo.kubernetes.com --username=kubeuser --password=kubepassword

# permanently save the namespace for all subsequent kubectl commands in that context.
kubectl config set-context --current --namespace=ggckad-s2

# set a context utilizing a specific username and namespace.
kubectl config set-context gce --user=cluster-admin --namespace=foo \
  && kubectl config use-context gce

kubectl config unset users.foo                       # delete user foo

# short alias to set/show context/namespace (only works for bash and bash-compatible shells, current context to be set before using kn to set namespace)
alias kx='f() { [ "$1" ] && kubectl config use-context $1 || kubectl config current-context ; } ; f'
alias kn='f() { [ "$1" ] && kubectl config set-context --current --namespace $1 || kubectl config view --minify | grep namespace | cut -d" " -f6 ; } ; f'
Kubectl apply
apply manages applications through files defining Kubernetes resources. It creates and updates resources in a cluster through running kubectl apply. This is the recommended way of managing Kubernetes applications on production. See Kubectl Book.
Creating objects
Kubernetes manifests can be defined in YAML or JSON. The file extension .yaml,
.yml, and .json can be used.
kubectl apply -f ./my-manifest.yaml                 # create resource(s)
kubectl apply -f ./my1.yaml -f ./my2.yaml           # create from multiple files
kubectl apply -f ./dir                              # create resource(s) in all manifest files in dir
kubectl apply -f https://example.com/manifest.yaml  # create resource(s) from url (Note: this is an example domain and does not contain a valid manifest)
kubectl create deployment nginx --image=nginx       # start a single instance of nginx

# create a Job which prints "Hello World"
kubectl create job hello --image=busybox:1.28 -- echo "Hello World"

# create a CronJob that prints "Hello World" every minute
kubectl create cronjob hello --image=busybox:1.28   --schedule="*/1 * * * *" -- echo "Hello World"

kubectl explain pods                           # get the documentation for pod manifests

# Create multiple YAML objects from stdin
kubectl apply -f - <<EOF
apiVersion: v1
kind: Pod
metadata:
  name: busybox-sleep
spec:
  containers:
  - name: busybox
    image: busybox:1.28
    args:
    - sleep
    - "1000000"
---
apiVersion: v1
kind: Pod
metadata:
  name: busybox-sleep-less
spec:
  containers:
  - name: busybox
    image: busybox:1.28
    args:
    - sleep
    - "1000"
EOF

# Create a secret with several keys
kubectl apply -f - <<EOF
apiVersion: v1
kind: Secret
metadata:
  name: mysecret
type: Opaque
data:
  password: $(echo -n "s33msi4" | base64 -w0)
  username: $(echo -n "jane" | base64 -w0)
EOF
Viewing and finding resources
# Get commands with basic output
kubectl get services                          # List all services in the namespace
kubectl get pods --all-namespaces             # List all pods in all namespaces
kubectl get pods -o wide                      # List all pods in the current namespace, with more details
kubectl get deployment my-dep                 # List a particular deployment
kubectl get pods                              # List all pods in the namespace
kubectl get pod my-pod -o yaml                # Get a pod's YAML

# Describe commands with verbose output
kubectl describe nodes my-node
kubectl describe pods my-pod

# List Services Sorted by Name
kubectl get services --sort-by=.metadata.name

# List pods Sorted by Restart Count
kubectl get pods --sort-by='.status.containerStatuses[0].restartCount'

# List PersistentVolumes sorted by capacity
kubectl get pv --sort-by=.spec.capacity.storage

# Get the version label of all pods with label app=cassandra
kubectl get pods --selector=app=cassandra -o \
  jsonpath='{.items[*].metadata.labels.version}'

# Retrieve the value of a key with dots, e.g. 'ca.crt'
kubectl get configmap myconfig \
  -o jsonpath='{.data.ca\.crt}'

# Retrieve a base64 encoded value with dashes instead of underscores.
kubectl get secret my-secret --template='{{index .data "key-name-with-dashes"}}'

# Get all worker nodes (use a selector to exclude results that have a label
# named 'node-role.kubernetes.io/control-plane')
kubectl get node --selector='!node-role.kubernetes.io/control-plane'

# Get all running pods in the namespace
kubectl get pods --field-selector=status.phase=Running

# Get ExternalIPs of all nodes
kubectl get nodes -o jsonpath='{.items[*].status.addresses[?(@.type=="ExternalIP")].address}'

# List Names of Pods that belong to Particular RC
# "jq" command useful for transformations that are too complex for jsonpath, it can be found at https://jqlang.github.io/jq/
sel=${$(kubectl get rc my-rc --output=json | jq -j '.spec.selector | to_entries | .[] | "\(.key)=\(.value),"')%?}
echo $(kubectl get pods --selector=$sel --output=jsonpath={.items..metadata.name})

# Show labels for all pods (or any other Kubernetes object that supports labelling)
kubectl get pods --show-labels

# Check which nodes are ready
JSONPATH='{range .items[*]}{@.metadata.name}:{range @.status.conditions[*]}{@.type}={@.status};{end}{end}' \
 && kubectl get nodes -o jsonpath="$JSONPATH" | grep "Ready=True"

# Check which nodes are ready with custom-columns
kubectl get node -o custom-columns='NODE_NAME:.metadata.name,STATUS:.status.conditions[?(@.type=="Ready")].status'

# Output decoded secrets without external tools
kubectl get secret my-secret -o go-template='{{range $k,$v := .data}}{{"### "}}{{$k}}{{"\n"}}{{$v|base64decode}}{{"\n\n"}}{{end}}'

# List all Secrets currently in use by a pod
kubectl get pods -o json | jq '.items[].spec.containers[].env[]?.valueFrom.secretKeyRef.name' | grep -v null | sort | uniq

# List all containerIDs of initContainer of all pods
# Helpful when cleaning up stopped containers, while avoiding removal of initContainers.
kubectl get pods --all-namespaces -o jsonpath='{range .items[*].status.initContainerStatuses[*]}{.containerID}{"\n"}{end}' | cut -d/ -f3

# List Events sorted by timestamp
kubectl get events --sort-by=.metadata.creationTimestamp

# List all warning events
kubectl events --types=Warning

# Compares the current state of the cluster against the state that the cluster would be in if the manifest was applied.
kubectl diff -f ./my-manifest.yaml

# Produce a period-delimited tree of all keys returned for nodes
# Helpful when locating a key within a complex nested JSON structure
kubectl get nodes -o json | jq -c 'paths|join(".")'

# Produce a period-delimited tree of all keys returned for pods, etc
kubectl get pods -o json | jq -c 'paths|join(".")'

# Produce ENV for all pods, assuming you have a default container for the pods, default namespace and the `env` command is supported.
# Helpful when running any supported command across all pods, not just `env`
for pod in $(kubectl get po --output=jsonpath={.items..metadata.name}); do echo $pod && kubectl exec -it $pod -- env; done

# Get a deployment's status subresource
kubectl get deployment nginx-deployment --subresource=status
Updating resources
kubectl set image deployment/frontend www=image:v2               # Rolling update "www" containers of "frontend" deployment, updating the image
kubectl rollout history deployment/frontend                      # Check the history of deployments including the revision
kubectl rollout undo deployment/frontend                         # Rollback to the previous deployment
kubectl rollout undo deployment/frontend --to-revision=2         # Rollback to a specific revision
kubectl rollout status -w deployment/frontend                    # Watch rolling update status of "frontend" deployment until completion
kubectl rollout restart deployment/frontend                      # Rolling restart of the "frontend" deployment


cat pod.json | kubectl replace -f -                              # Replace a pod based on the JSON passed into stdin

# Force replace, delete and then re-create the resource. Will cause a service outage.
kubectl replace --force -f ./pod.json

# Create a service for a replicated nginx, which serves on port 80 and connects to the containers on port 8000
kubectl expose rc nginx --port=80 --target-port=8000

# Update a single-container pod's image version (tag) to v4
kubectl get pod mypod -o yaml | sed 's/\(image: myimage\):.*$/\1:v4/' | kubectl replace -f -

kubectl label pods my-pod new-label=awesome                      # Add a Label
kubectl label pods my-pod new-label-                             # Remove a label
kubectl label pods my-pod new-label=new-value --overwrite        # Overwrite an existing value
kubectl annotate pods my-pod icon-url=http://goo.gl/XXBTWq       # Add an annotation
kubectl annotate pods my-pod icon-url-                           # Remove annotation
kubectl autoscale deployment foo --min=2 --max=10                # Auto scale a deployment "foo"
Patching resources
# Partially update a node
kubectl patch node k8s-node-1 -p '{"spec":{"unschedulable":true}}'

# Update a container's image; spec.containers[*].name is required because it's a merge key
kubectl patch pod valid-pod -p '{"spec":{"containers":[{"name":"kubernetes-serve-hostname","image":"new image"}]}}'

# Update a container's image using a json patch with positional arrays
kubectl patch pod valid-pod --type='json' -p='[{"op": "replace", "path": "/spec/containers/0/image", "value":"new image"}]'

# Disable a deployment livenessProbe using a json patch with positional arrays
kubectl patch deployment valid-deployment  --type json   -p='[{"op": "remove", "path": "/spec/template/spec/containers/0/livenessProbe"}]'

# Add a new element to a positional array
kubectl patch sa default --type='json' -p='[{"op": "add", "path": "/secrets/1", "value": {"name": "whatever" } }]'

# Update a deployment's replica count by patching its scale subresource
kubectl patch deployment nginx-deployment --subresource='scale' --type='merge' -p '{"spec":{"replicas":2}}'
Editing resources
Edit any API resource in your preferred editor.
kubectl edit svc/docker-registry                      # Edit the service named docker-registry
KUBE_EDITOR="nano" kubectl edit svc/docker-registry   # Use an alternative editor
Scaling resources
kubectl scale --replicas=3 rs/foo                                 # Scale a replicaset named 'foo' to 3
kubectl scale --replicas=3 -f foo.yaml                            # Scale a resource specified in "foo.yaml" to 3
kubectl scale --current-replicas=2 --replicas=3 deployment/mysql  # If the deployment named mysql's current size is 2, scale mysql to 3
kubectl scale --replicas=5 rc/foo rc/bar rc/baz                   # Scale multiple replication controllers
Deleting resources
kubectl delete -f ./pod.json                                      # Delete a pod using the type and name specified in pod.json
kubectl delete pod unwanted --now                                 # Delete a pod with no grace period
kubectl delete pod,service baz foo                                # Delete pods and services with same names "baz" and "foo"
kubectl delete pods,services -l name=myLabel                      # Delete pods and services with label name=myLabel
kubectl -n my-ns delete pod,svc --all                             # Delete all pods and services in namespace my-ns,
# Delete all pods matching the awk pattern1 or pattern2
kubectl get pods  -n mynamespace --no-headers=true | awk '/pattern1|pattern2/{print $1}' | xargs  kubectl delete -n mynamespace pod
Interacting with running Pods
kubectl logs my-pod                                 # dump pod logs (stdout)
kubectl logs -l name=myLabel                        # dump pod logs, with label name=myLabel (stdout)
kubectl logs my-pod --previous                      # dump pod logs (stdout) for a previous instantiation of a container
kubectl logs my-pod -c my-container                 # dump pod container logs (stdout, multi-container case)
kubectl logs -l name=myLabel -c my-container        # dump pod container logs, with label name=myLabel (stdout)
kubectl logs my-pod -c my-container --previous      # dump pod container logs (stdout, multi-container case) for a previous instantiation of a container
kubectl logs -f my-pod                              # stream pod logs (stdout)
kubectl logs -f my-pod -c my-container              # stream pod container logs (stdout, multi-container case)
kubectl logs -f -l name=myLabel --all-containers    # stream all pods logs with label name=myLabel (stdout)
kubectl run -i --tty busybox --image=busybox:1.28 -- sh  # Run pod as interactive shell
kubectl run nginx --image=nginx -n mynamespace      # Start a single instance of nginx pod in the namespace of mynamespace
kubectl run nginx --image=nginx --dry-run=client -o yaml > pod.yaml
                                                    # Generate spec for running pod nginx and write it into a file called pod.yaml
kubectl attach my-pod -i                            # Attach to Running Container
kubectl port-forward my-pod 5000:6000               # Listen on port 5000 on the local machine and forward to port 6000 on my-pod
kubectl exec my-pod -- ls /                         # Run command in existing pod (1 container case)
kubectl exec --stdin --tty my-pod -- /bin/sh        # Interactive shell access to a running pod (1 container case)
kubectl exec my-pod -c my-container -- ls /         # Run command in existing pod (multi-container case)
kubectl top pod POD_NAME --containers               # Show metrics for a given pod and its containers
kubectl top pod POD_NAME --sort-by=cpu              # Show metrics for a given pod and sort it by 'cpu' or 'memory'
Copying files and directories to and from containers
kubectl cp /tmp/foo_dir my-pod:/tmp/bar_dir            # Copy /tmp/foo_dir local directory to /tmp/bar_dir in a remote pod in the current namespace
kubectl cp /tmp/foo my-pod:/tmp/bar -c my-container    # Copy /tmp/foo local file to /tmp/bar in a remote pod in a specific container
kubectl cp /tmp/foo my-namespace/my-pod:/tmp/bar       # Copy /tmp/foo local file to /tmp/bar in a remote pod in namespace my-namespace
kubectl cp my-namespace/my-pod:/tmp/foo /tmp/bar       # Copy /tmp/foo from a remote pod to /tmp/bar locally
kubectl cp requires that the 'tar' binary is present in your container image. If 'tar' is not present, kubectl cp will fail.
For advanced use cases, such as symlinks, wildcard expansion or file mode preservation consider using kubectl exec.
tar cf - /tmp/foo | kubectl exec -i -n my-namespace my-pod -- tar xf - -C /tmp/bar           # Copy /tmp/foo local file to /tmp/bar in a remote pod in namespace my-namespace
kubectl exec -n my-namespace my-pod -- tar cf - /tmp/foo | tar xf - -C /tmp/bar    # Copy /tmp/foo from a remote pod to /tmp/bar locally
Interacting with Deployments and Services
kubectl logs deploy/my-deployment                         # dump Pod logs for a Deployment (single-container case)
kubectl logs deploy/my-deployment -c my-container         # dump Pod logs for a Deployment (multi-container case)

kubectl port-forward svc/my-service 5000                  # listen on local port 5000 and forward to port 5000 on Service backend
kubectl port-forward svc/my-service 5000:my-service-port  # listen on local port 5000 and forward to Service target port with name <my-service-port>

kubectl port-forward deploy/my-deployment 5000:6000       # listen on local port 5000 and forward to port 6000 on a Pod created by <my-deployment>
kubectl exec deploy/my-deployment -- ls                   # run command in first Pod and first container in Deployment (single- or multi-container cases)
Interacting with Nodes and cluster
kubectl cordon my-node                                                # Mark my-node as unschedulable
kubectl drain my-node                                                 # Drain my-node in preparation for maintenance
kubectl uncordon my-node                                              # Mark my-node as schedulable
kubectl top node my-node                                              # Show metrics for a given node
kubectl cluster-info                                                  # Display addresses of the master and services
kubectl cluster-info dump                                             # Dump current cluster state to stdout
kubectl cluster-info dump --output-directory=/path/to/cluster-state   # Dump current cluster state to /path/to/cluster-state

# View existing taints on which exist on current nodes.
kubectl get nodes -o='custom-columns=NodeName:.metadata.name,TaintKey:.spec.taints[*].key,TaintValue:.spec.taints[*].value,TaintEffect:.spec.taints[*].effect'

# If a taint with that key and effect already exists, its value is replaced as specified.
kubectl taint nodes foo dedicated=special-user:NoSchedule
Resource types
List all supported resource types along with their shortnames, API group, whether they are namespaced, and kind:
kubectl api-resources
Other operations for exploring API resources:
kubectl api-resources --namespaced=true      # All namespaced resources
kubectl api-resources --namespaced=false     # All non-namespaced resources
kubectl api-resources -o name                # All resources with simple output (only the resource name)
kubectl api-resources -o wide                # All resources with expanded (aka "wide") output
kubectl api-resources --verbs=list,get       # All resources that support the "list" and "get" request verbs
kubectl api-resources --api-group=extensions # All resources in the "extensions" API group
Formatting output
To output details to your terminal window in a specific format, add the -o (or --output) flag to a supported kubectl command.
| Output format | Description |
|---|---|
-o=custom-columns=<spec> |
Print a table using a comma separated list of custom columns |
-o=custom-columns-file=<filename> |
Print a table using the custom columns template in the <filename> file |
-o=go-template=<template> |
Print the fields defined in a golang template |
-o=go-template-file=<filename> |
Print the fields defined by the golang template in the <filename> file |
-o=json |
Output a JSON formatted API object |
-o=jsonpath=<template> |
Print the fields defined in a jsonpath expression |
-o=jsonpath-file=<filename> |
Print the fields defined by the jsonpath expression in the <filename> file |
-o=name |
Print only the resource name and nothing else |
-o=wide |
Output in the plain-text format with any additional information, and for pods, the node name is included |
-o=yaml |
Output a YAML formatted API object |
Examples using -o=custom-columns:
# All images running in a cluster
kubectl get pods -A -o=custom-columns='DATA:spec.containers[*].image'

# All images running in namespace: default, grouped by Pod
kubectl get pods --namespace default --output=custom-columns="NAME:.metadata.name,IMAGE:.spec.containers[*].image"

 # All images excluding "registry.k8s.io/coredns:1.6.2"
kubectl get pods -A -o=custom-columns='DATA:spec.containers[?(@.image!="registry.k8s.io/coredns:1.6.2")].image'

# All fields under metadata regardless of name
kubectl get pods -A -o=custom-columns='DATA:metadata.*'
More examples in the kubectl reference documentation.
Kubectl output verbosity and debugging
Kubectl verbosity is controlled with the -v or --v flags followed by an integer representing the log level. General Kubernetes logging conventions and the associated log levels are described here.
| Verbosity | Description |
|---|---|
--v=0 |
Generally useful for this to always be visible to a cluster operator. |
--v=1 |
A reasonable default log level if you don't want verbosity. |
--v=2 |
Useful steady state information about the service and important log messages that may correlate to significant changes in the system. This is the recommended default log level for most systems. |
--v=3 |
Extended information about changes. |
--v=4 |
Debug level verbosity. |
--v=5 |
Trace level verbosity. |
--v=6 |
Display requested resources. |
--v=7 |
Display HTTP request headers. |
--v=8 |
Display HTTP request contents. |
--v=9 |
Display HTTP request contents without truncation of contents. |